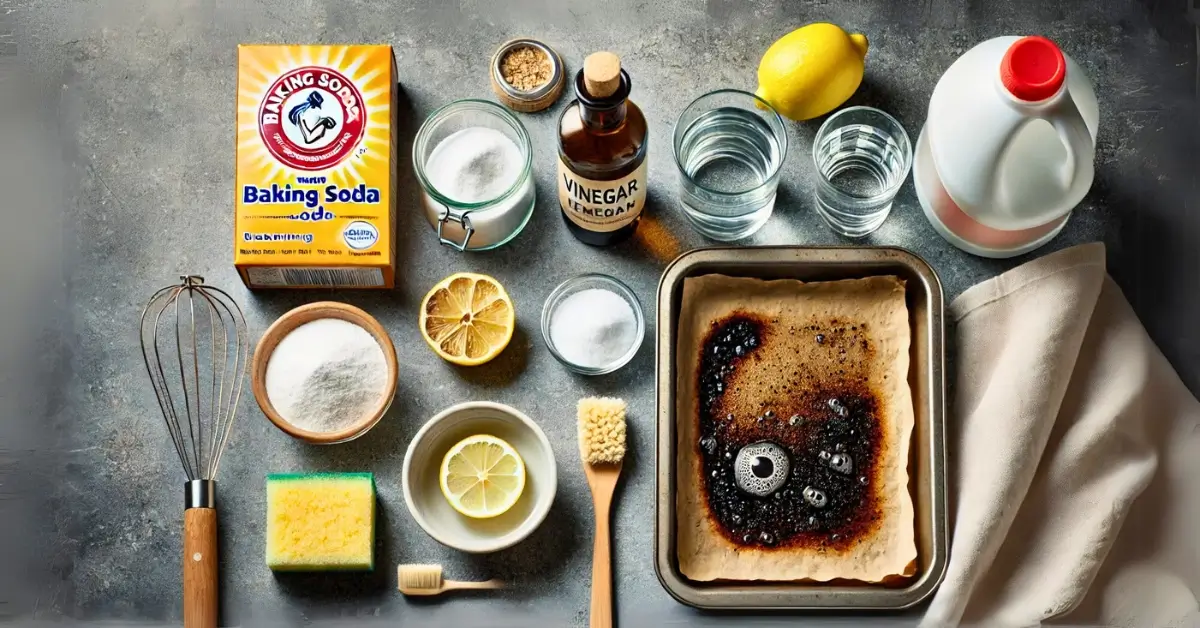
We’ve all faced the dreaded burnt pan situation! Whether you got distracted while cooking or underestimated the heat, your once-shiny cookware is now covered in a layer of stubborn, burnt residue. Scrubbing endlessly doesn’t seem to help, and you’re left wondering if your favorite burnt saucepan or burnt stainless steel pot is beyond saving. But don’t toss it out just yet! There are proven burnt pan solutions that can help you restore your cookware without spending hours scrubbing. You’re in the right place if you’ve been searching for ways to clean burnt pan or revive a clean burnt enamel pot. You can make even the toughest stains disappear with a few simple household ingredients!
Our step-by-step cleaning methods will have your pots and pans sparkling again. So, let’s dive into these powerful cleaning techniques and say goodbye to burnt messes forever!
How I Tested the Different Methods
When it came to finding the best burnt pan solution, I didn’t just rely on random internet hacks—I put them to the test myself! Burnt pans, whether it’s a burnt saucepan, burnt stainless steel pot, or a scorched baking pan, all require different cleaning techniques based on the material and severity of the burnt residue. To ensure I was recommending only the most effective methods, I tested each one using common household ingredients and real-life kitchen messes.
I gathered a variety of burnt pans and pots periodically. I tried different techniques, such as using vinegar, baking soda, boiling water, and commercial cleaners, to determine which method worked best for cleaning burnt pans without damaging the surface. I also paid attention to how long each method took, how much scrubbing was needed, and whether the results were worth the effort.
The good news? By testing these 8 Super-effective Methods To Clean Burnt Pans and Pots, I was able to find the most effective, time-saving, and hassle-free solutions.
BUDDY’S QUICK OVREVIEW
The Best Way to Clean Burnt Pans And Pots
Simply sprinkle baking soda generously over the burnt areas, add a small amount of water to create a paste, and scrub gently with a crumpled ball of aluminum foil. For tougher stains, let the paste sit for 10-15 minutes before scrubbing. If needed, repeat the process until your burnt pan bottom looks like new!
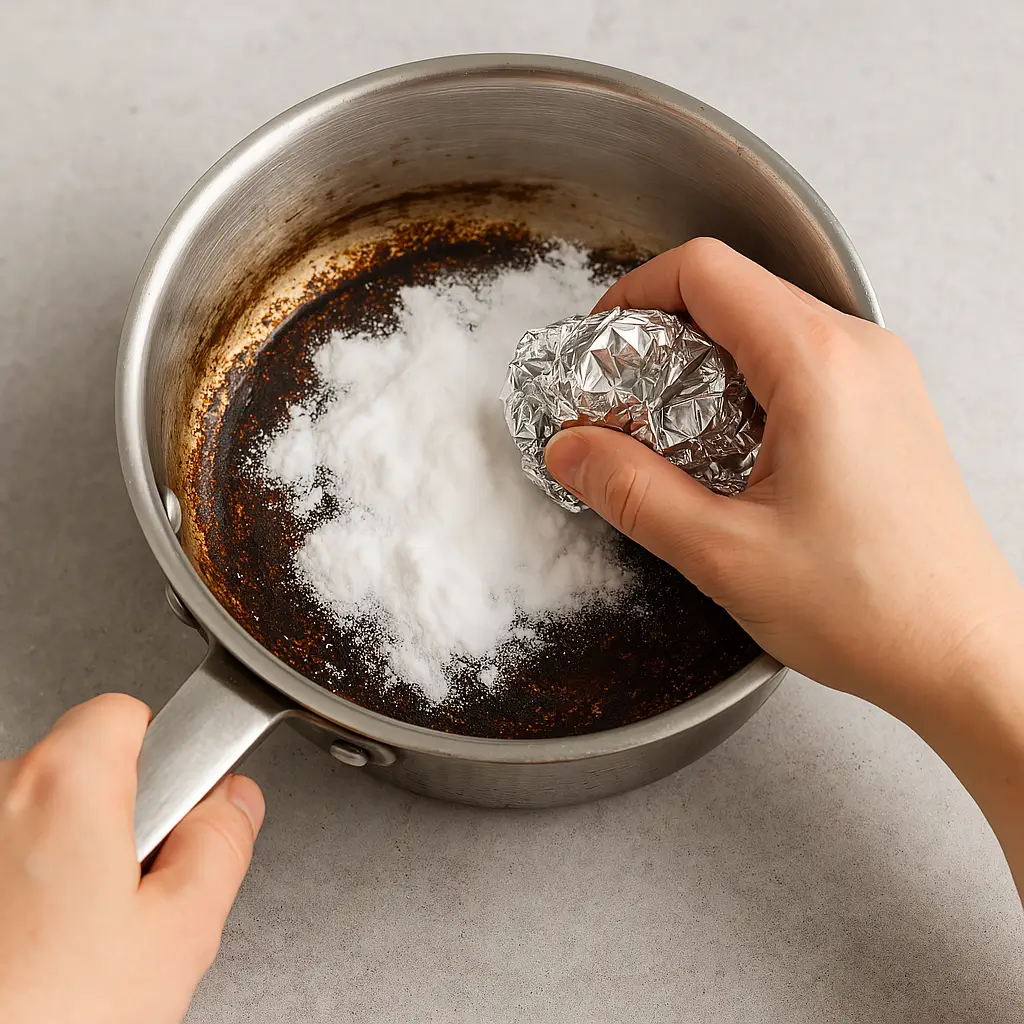
METHOD-1: Baking Soda, Aluminum Foil
- Estimated Time: 15–25 minutes (depends on how badly the pan is)
The Practical: So, I took one of my most tragically burnt stainless steel pans—I’m talking thick, black crust stuck like glue after I accidentally left pasta on high heat and spaced out.
Here’s exactly what I did:
- Sprinkled about 3 tablespoons of baking soda all over the burnt base.
- Poured in just enough warm water to form a paste (not too runny, not too thick).
- Let it sit for 5 minutes to soften the burnt food.
- Crumpled up a hand-sized ball of aluminum foil—this would be my scrubber.
- Started scrubbing in circles—not too hard, just enough pressure.
- After about 4–5 minutes of scrubbing, I started seeing the burnt food lifting off like magic.
- I rinsed it, checked for remaining spots, and repeated the scrub for another 3 minutes on the stubborn areas.
How It Went: It started a little discouraging—the first few minutes didn’t seem like anything was happening. But once the baking soda kicked in and the foil got some grip, things started moving fast. The burnt spots were peeling away like dried paint. I was weirdly excited.
I expected a major arm workout, but honestly? It wasn’t that bad. Way easier than using steel wool or scrubbing pads that take forever.
The Result: The pan wasn’t brand new shiny (let’s be real), but it was usable and looked 90% better. No more crusty bottom, no black patches, no burnt smell. Just a few tiny scratches on the base, but nothing serious. It was honestly shocking how effective it was for something that cost me less than a dollar.
Final Rating: 9/10 [click to expand]
- ✅ Cheap
- ✅ Easily available ingredients
- ✅ No harsh chemicals
- ✅ Works on most pans, especially burnt stainless steel pots, fry pan bottoms, and even baking pans
- ❗ Slight scratches possible on delicate or enameled cookware
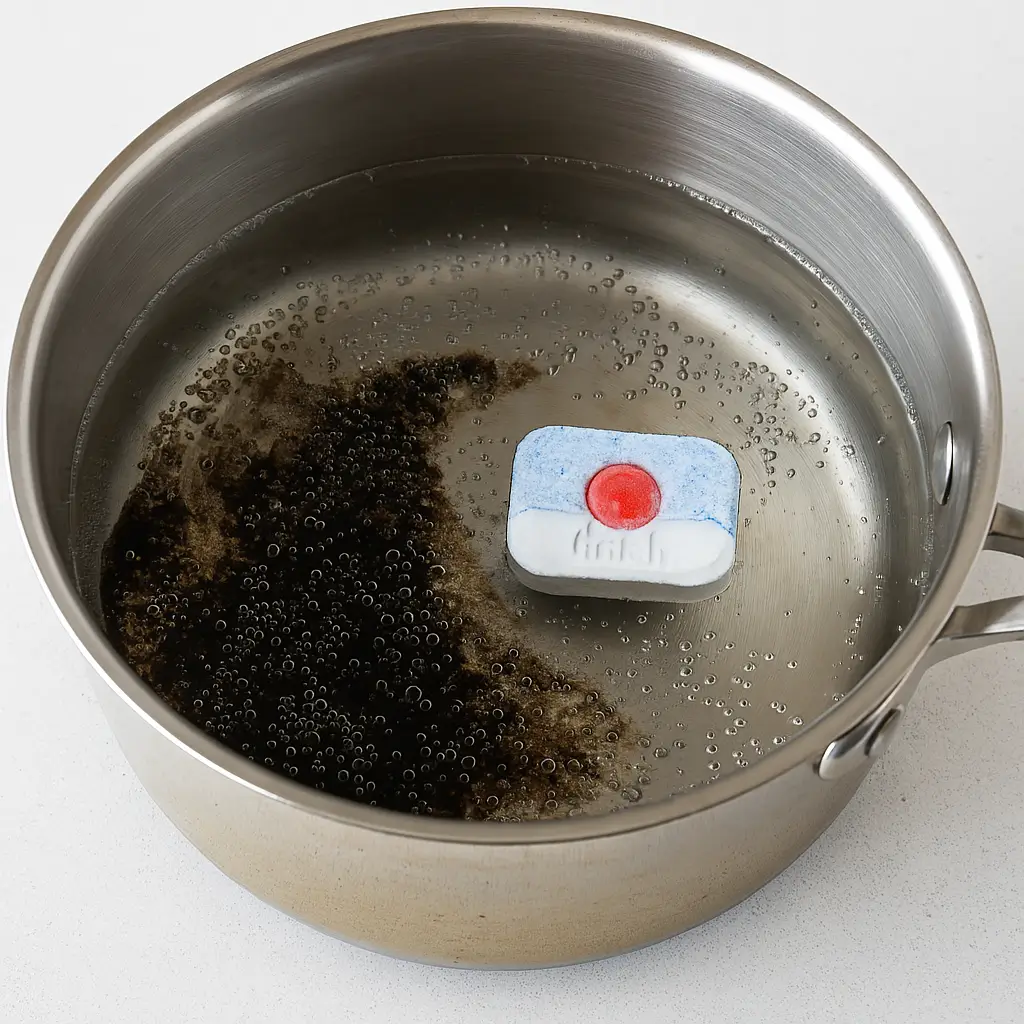
METHOD-2: dishwasher tablet
- Estimated Time: 20–30 minutes (mostly soaking + a bit of scrubbing)
The Practical: So I took a burnt silver pot this time. It had a thick layer of caramelized sugar stuck at the bottom. Notoriously hard to remove
Here’s how I used the dishwasher tablet:
- Placed the burnt pot in the sink.
- Dropped in one regular dishwasher tablet (I used Finish, but any brand should work).
- Filled the pot with hot water until it just covered the burnt area.
- Let it soak for 15–20 minutes so the tablet can break down and do its thing.
- After soaking, I used a non-abrasive sponge to scrub the base.
- Within a couple of minutes, the burnt food started sliding off with minimal pressure!
How It Went: At first, it looked like nothing was happening while soaking, but when I got to scrubbing, the gunk came off like melted chocolate. It was so satisfying. No chemical smell, no strong fumes. I was honestly shocked at how gentle but effective it was.
Also, it required very little elbow grease, which is a huge win when you’re not in the mood to scrub like crazy.
The Result: The bottom of the pot came out shiny, smooth, and almost like new. Seriously, this method worked especially well on stainless steel. I didn’t have to repeat the process or use any extra tools. The dishwasher tablet pretty much dissolved the burnt layer. It also left the pot smelling clean and fresh—which is a bonus after a burnt mess.
Ingredients & Cost
- 1 Dishwasher tablet (around $0.20 to $0.50 per tab)
- Hot water
- Optional: Sponge or non-scratch pad
Total cost: under 50 cents per use!
Final Rating: 9.5/10 [click to expand]
- ✅ Super effective on burnt stainless steel pots
- ✅ Minimal scrubbing needed
- ✅ Cheap and easy to find
- ✅ Great for cleaning burnt pans, cleaning fry pan bottoms, or clean burnt pot bottoms
- ❗ Not ideal for non-stick or enameled cookware (could strip coating)
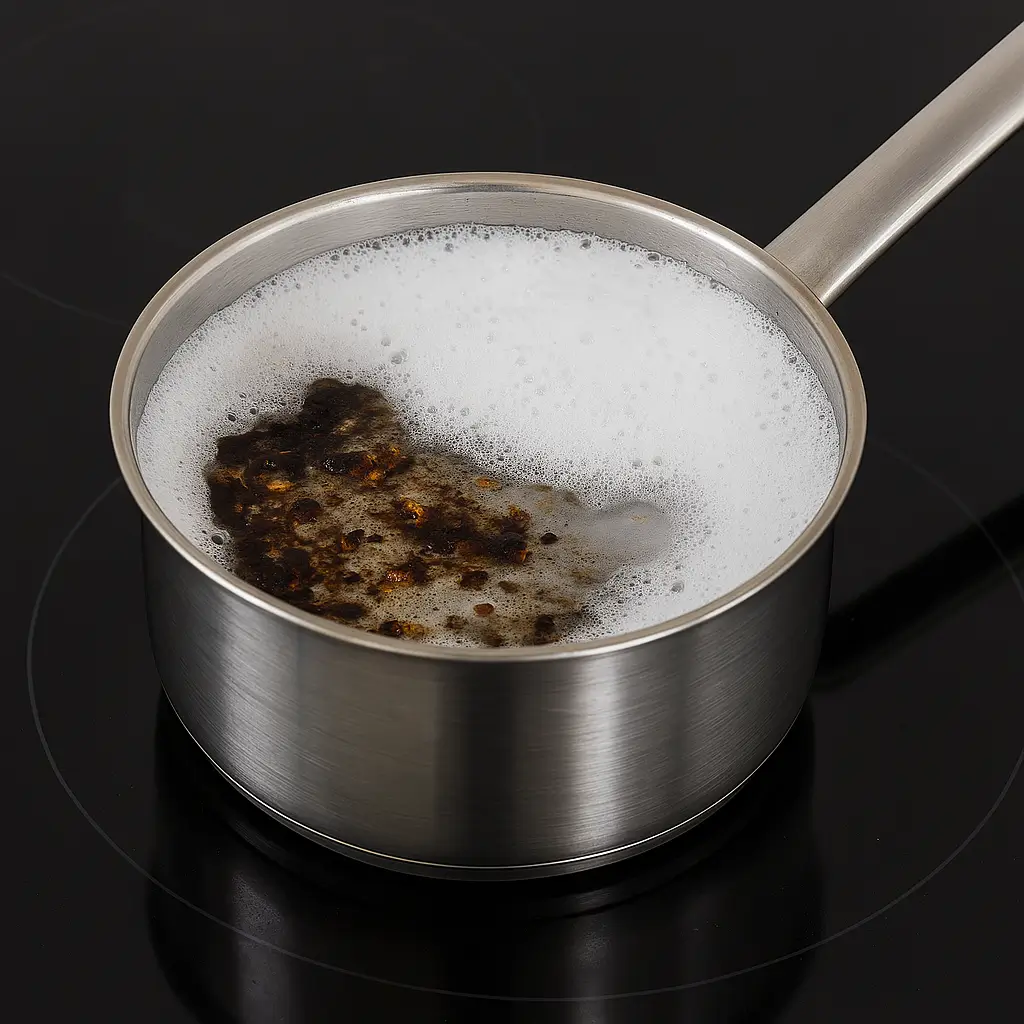
METHOD-3: vinegar and baking soda
- Estimated Time: 30–40 minutes (includes soak and fizz time)
The Practical: I grabbed a burnt saucepan that had stuck-on bits of pasta and blackened oil at the bottom. Here’s how I went about it:
What I Need:
- 1 cup white vinegar
- 2 tablespoons baking soda
- 1 cup water
- Soft sponge or brush
The Cleaning Steps:
- First, I poured about 1 cup of water and 1 cup of white vinegar into the burnt pot—just enough to fully cover the burnt area.
- Brought the mixture to a gentle boil for about 5 minutes (this helps loosen the burnt food).
- Turned off the heat and then added 2 tablespoons of baking soda. (⚠️ This part gets fizzy, like a volcano experiment—super satisfying to watch.)
- Let the bubbly mix sit for another 15–20 minutes.
- After it cooled down a bit, I poured out the liquid and started scrubbing with a sponge.
How It Went: The vinegar boiling helped lift some of the burnt gunk by itself. But the magic really happened after adding baking soda. That fizzy reaction made the whole burnt mess softer and way easier to scrub off.
I still had to scrub a bit harder in the corners, especially on the burnt pan bottom, but it wasn’t too bad. Definitely way better than dry-scrubbing.
The Result: After one round, the pan looked 80–90% better, and after a second light scrub with just baking soda, it was back to looking almost new. Perfect for cleaning burnt pans, burnt stainless steel pots, or even burnt enamel pots if you’re careful.
If you’ve got a clean burnt baking pan or how to clean burnt silver pot kinda situation—this method works decently well, though deep stains might need another round.
Ingredients & Cost
- White vinegar – ~$0.10 per use
- Baking soda – ~$0.05 per use
- Water – practically free
- Sponge – reusable
Total cost: under $0.20 per clean — cheap and available in every kitchen!
If you want a safe, cheap, chemical-free way to clean a burnt pot, this is your jam. But if your pan’s been through actual war, you might wanna follow up with the aluminum foil or dishwasher tablet methods.
Final Rating: 8.5/10 [click to expand]
- ✅ Super budget-friendly
- ✅ Easy ingredients, non-toxic
- ✅ Fizzing reaction is satisfying to watch
- ❗ Doesn’t always get everything off on the first try
- ❗ May leave some white powder residue (just rinse well)
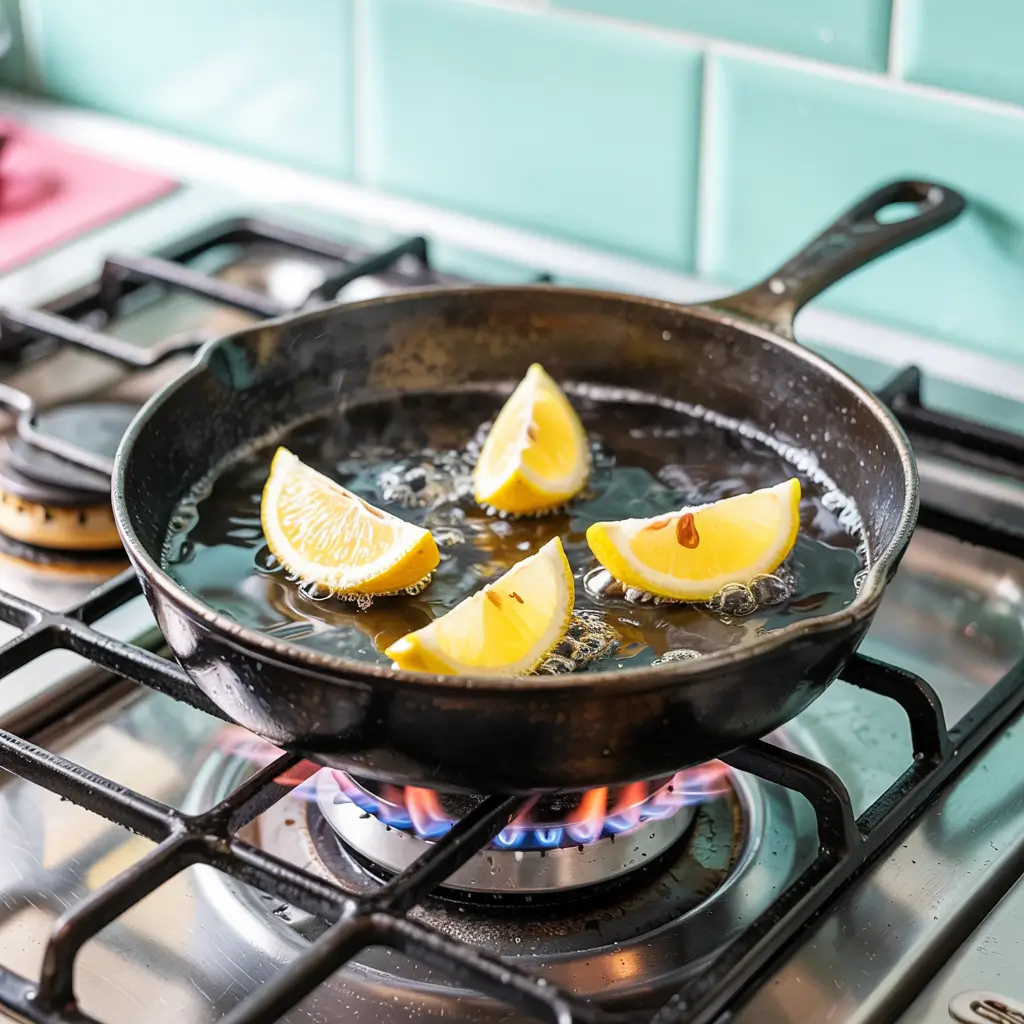
METHOD-4: Clean a burnt pot with lemon
Alright, let’s talk about the lemon method —one of the most “natural” and aesthetically pleasing ways to clean a burnt pot. If you’re the type who likes things smelling fresh while you’re scrubbing burnt gunk off your favorite pan, this one’s for you. It’s super eco-friendly, easy to do, and best of all, your kitchen will smell like a spa instead of chemicals.
But does it actually work for cleaning burnt pan bottoms, burnt saucepans, or tough burnt food? Let me break it down for you with a real test I did myself.
- Estimated Time: 30–35 minutes (10 mins prep, 20 mins simmer and rest)
What You Need:
- 2–3 lemons (cut into thick slices or wedges)
- Enough water to cover the bottom of the pan
- A soft sponge or wooden scraper
The Practical: I took a burnt stainless steel pot that had rice and soy sauce stuck like cement on the bottom (you know that kind of dark brown mess). Here’s how it went down:
- I cut up 3 lemons and placed the slices directly on the bottom of the burnt pot.
- Then, I added just enough water to cover the burnt area—about 1 inch.
- Brought the whole thing to a boil and let it simmer for around 10–15 minutes.
- Turned off the heat and let the lemony water sit for another 10 minutes to cool down and soften the burnt bits.
- Scrubbed using a soft sponge and boom—big flakes of burnt stuff started lifting right off.
How It Went: The lemon’s acidity helped break down the burnt food a little, but not as dramatically as something like baking soda and vinegar. However, the boiling helped loosen up the mess and made it much easier to scrub. Plus, it didn’t scratch the pot, so if you’re trying to clean burnt enamel pots or silver pots, this is a safe method to use.
But let’s be real: if your pan looks like a lava pit, lemons alone won’t save it. You’ll probably have to follow up with a tougher method, like the foil ball or Bar Keepers Friend.
Final Results
- The skillet was 70% clean after the lemon simmer alone.
- Another round of scrubbing with lemon rind and warm water got me to around 85% clean.
- For really tough black stains? I’d still go with foil or dishwasher tabs next.
Ingredients & Cost:
- 2–3 Lemons – Around $1 (depending on season and where you live)
- Water – basically free
- Sponge – reusable
Total Cost: Around $1–$1.50 per clean
Final Thoughts: This is a feel-good, kitchen-friendly way to clean burnt food from pans, especially when you want something non-toxic and gentle. It’s great for regular maintenance or minor messes, but for deep, stubborn burns? It’s more of a warm-up act.
Rating: 7/10 [click to expand]
- ✅ Smells AMAZING
- ✅ Safe for delicate pots
- ✅ Great for light to medium burns
- ❗ Pricey if you’re doing it often (lemons aren’t cheap)
- ❗ Doesn’t cut through hardcore burnt layers alone
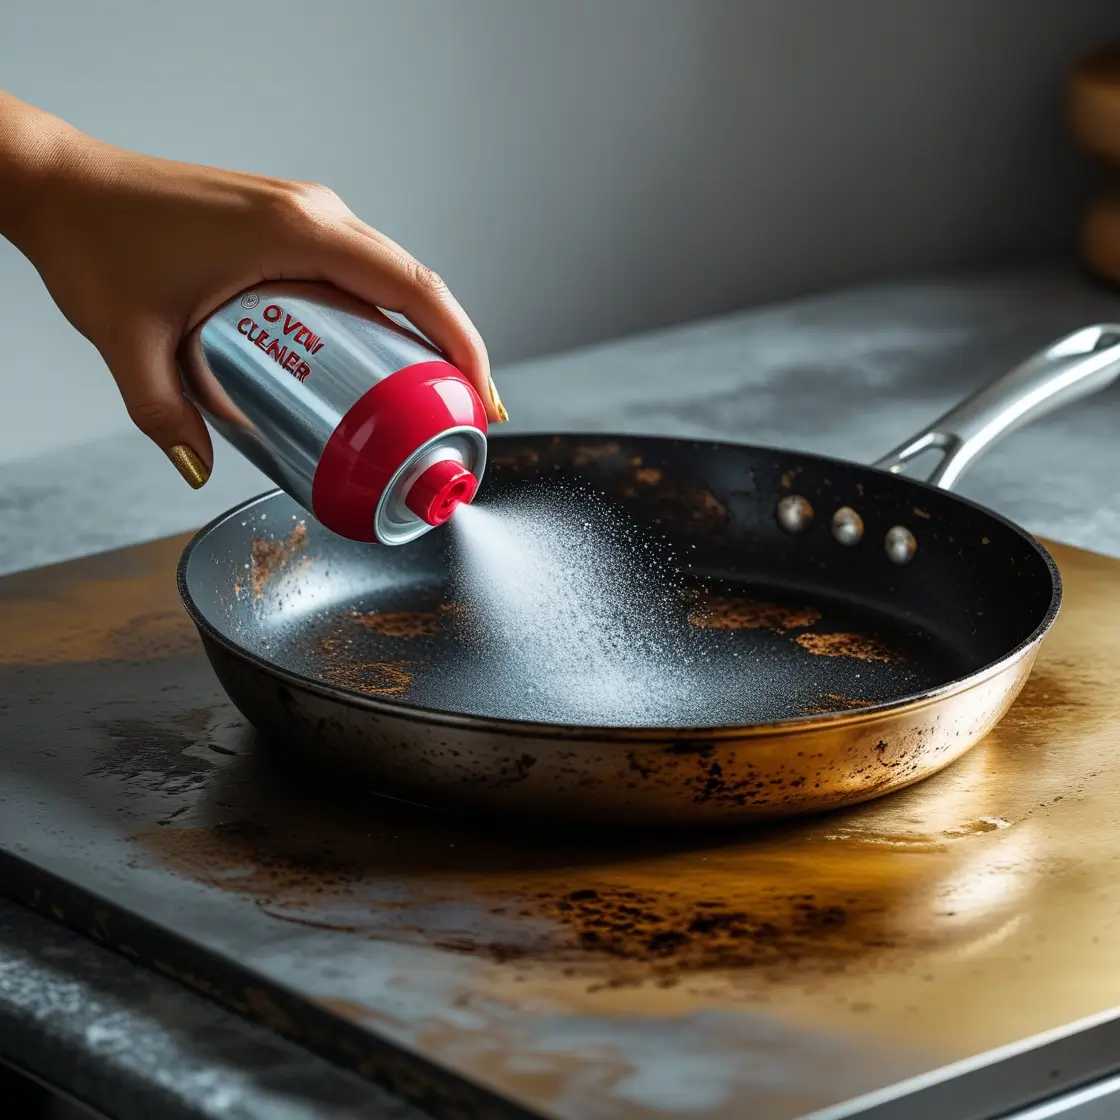
METHOD-5: Clean A Burnt Pot With “oven cleaner”
This one’s the real “no-messing-around” solution for those nightmare-level burnt pans. We’re talking about pans that look like you cooked lava in them. If baking soda, vinegar, foil, and even dishwasher tablets didn’t cut it, this is the nuclear option. It’s not fancy or natural, but it works. And yeah, I tested it, so I’m telling you straight up how it went.
- 🕒 Estimated Time: 1–2 hours (includes wait time)
What You Need:
- A can of Oven Cleaner (Easy-Off is a popular one)
- Gloves (non-negotiable – this stuff is harsh)
- A well-ventilated space (or do it outdoors if possible)
- A scrubby pad or sponge
- Plastic wrap (optional but helps a lot)
The Practical: So I took a stainless steel fry pan with a jet-black burnt bottom that I had honestly already given up on. You couldn’t even tell what the original metal looked like. Here’s how I used the oven cleaner:
- I sprayed a generous amount of oven cleaner all over the burnt area, top and bottom.
- Covered the entire pan with plastic wrap to keep it from drying out (helps it stay active longer).
- Let it sit outside for about 90 minutes. You definitely don’t want this stuff stinking up your kitchen.
- After waiting, I used gloves and a scrubby pad to wipe off the residue.
- Rinsed it thoroughly, then washed it again with regular dish soap.
How It Went: The gunk melted off like magic. Not even exaggerating. I barely had to scrub in most areas. It legit made the bottom of the pan look almost new again.
BUT… you’ve gotta be careful. The fumes are strong, so don’t try this in a closed kitchen or without gloves. Also, don’t use it on non-stick pans or anything you’re emotionally attached to unless you’ve read the label.
Final Results:
- The pan looked 90–95% brand new.
- The blackened burn layers? Gone.
- Even grease buildup that resisted other methods was dissolved.
Ingredients & Cost:
- Oven Cleaner: $4–$6 per can (lasts for multiple uses)
- Gloves: $1–$2
- Scrubber: You probably already have one
Total Cost: Around $6 max per deep clean (but cheaper if you’re doing multiple pans)
Rating: 9/10 [click to expand]
- ✅ Ultra-effective on heavy burns
- ✅ Removes layers other methods can’t touch
- ✅ Minimal scrubbing required
- ❗ Harsh chemical — must use safely
- ❗ Not for delicate or non-stick cookware
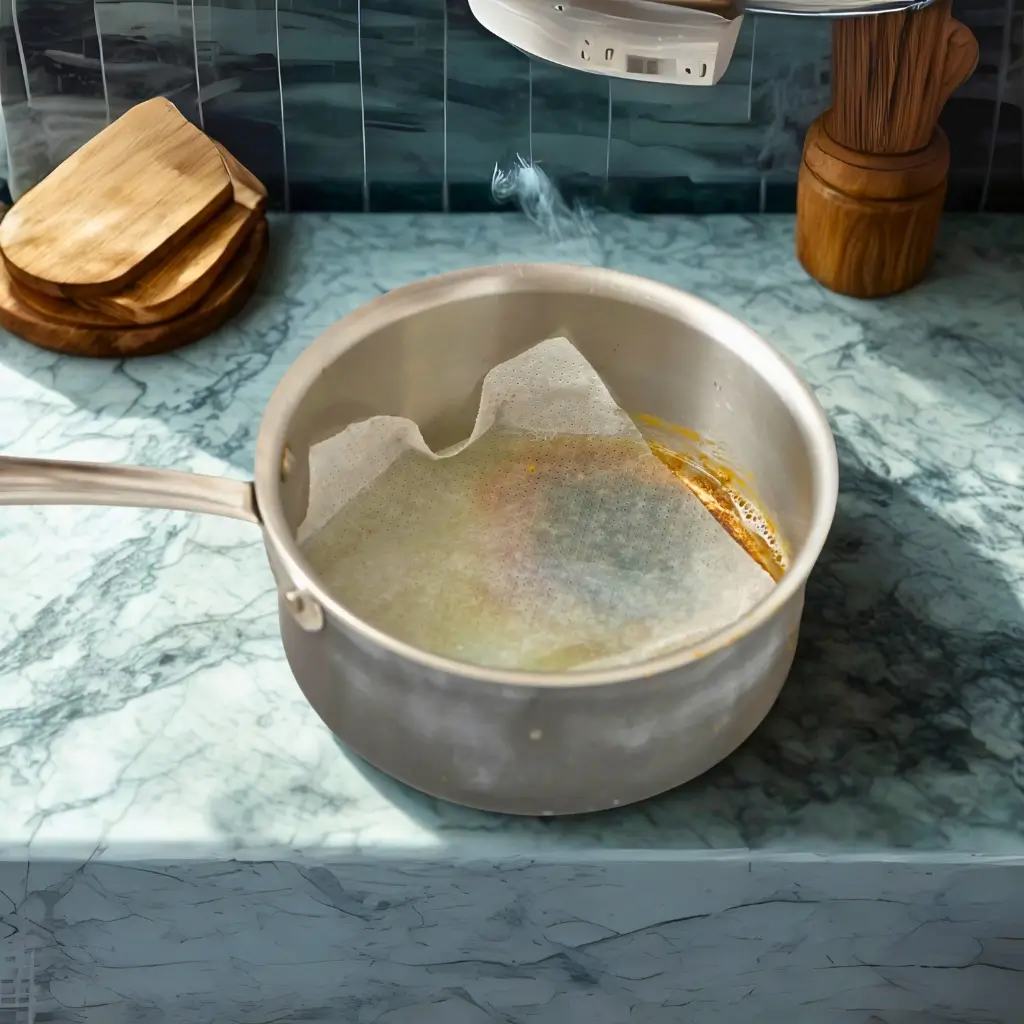
METHOD-6: Dryer Sheet
- Estimated Time: 1–2 hours (set it and forget it style)
What You’ll Need:
- 1 Dryer sheet (any brand works — I used Bounce)
- Hot water
- A burnt pot or pan (obviously)
- Dish soap (optional but helpful)
The Practical: So I grabbed an old stainless steel saucepan that had a layer of blackened sauce stuck to the bottom like tar. First, I filled the pan with hot tap water — enough to cover all the burnt areas. Then I tossed in a dryer sheet, pressing it down so it was fully submerged.
Some people also add a squirt of dish soap, which I did (Dawn, in my case). Then I just let the whole thing sit on the counter and chill for about 90 minutes.
When I came back, the water was brown and murky — which was oddly satisfying. I took the dryer sheet and started wiping — and BOOM 💥 the burnt gunk started lifting off super easily. I still had to use a bit of elbow grease on the worst areas, but it was 10x easier than scrubbing a dry burnt pan.
How It Went:
- The dryer sheet kind of works like a gentle softener-slash-loosener. It doesn’t melt the burn like oven cleaner or fizz like baking soda, but it softens the crud so you can wipe it off easier.
- It didn’t scratch the pan (bonus for non-stick cookware), and it smelled kinda fresh too.
- You won’t get a mirror shine, but for medium-level burns, it does the job shockingly well.
Final Results:
- Burnt food was 90% removed with almost no real scrubbing
- Worked best on pans where the food wasn’t baked on like cement
- Great for non-stick or delicate surfaces where you want to avoid harsh abrasives
💰 Cost Breakdown:
- Dryer sheet: Around $0.10–$0.20 per sheet
- Water: Practically free
- Dish soap: Optional, but adds maybe $0.05
Total: Under $0.30 for a full clean
Final Thoughts: The dryer sheet hack is a win in my book — especially if you’re someone who hates scrubbing or just doesn’t want to deal with harsh cleaners. It’s not the strongest method out there, but it’s super low effort and smells kinda nice too. Definitely a good trick to keep in your back pocket, especially when cleaning burnt pans, burnt enamel pots, or trying to soften burnt food before moving on to a tougher scrub.
Rating: 8/10 [click to expand]
- ✅ Incredibly cheap
- ✅ Easy and hands-off
- ✅ Perfect for lighter messes or “forgotten food” cleanups
- ❌ Not strong enough for heavy black crusted burns
- ❌ Might need a second soak for tougher spots
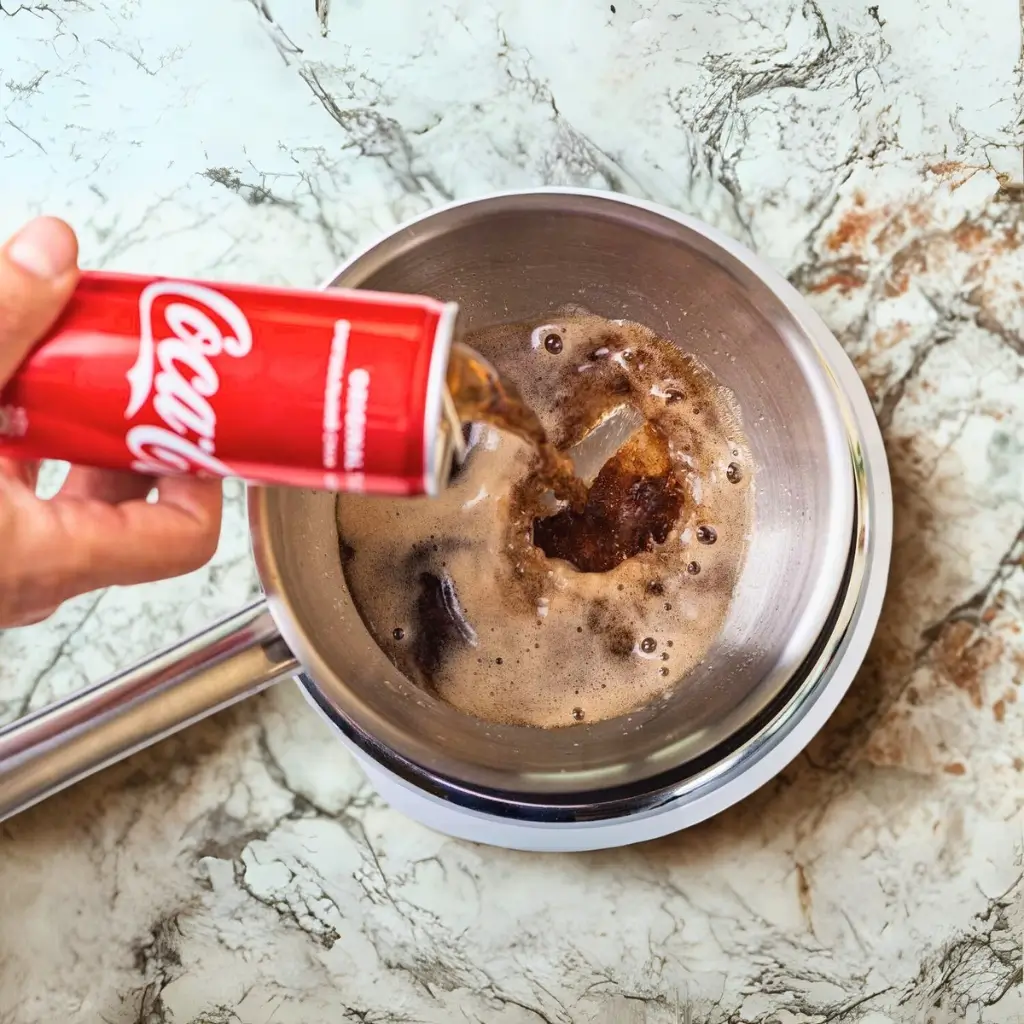
METHOD 7: coke
Coke has phosphoric acid and carbonation, which can break down rust, burnt food, and grime — kinda like a gentle chemical cleaner wrapped in sugary disguise
This method is perfect for when you’re dealing with a seriously scorched stainless steel pan or even cast iron (though you’ve gotta re-season that one later). Let me walk you through exactly how it went when I tested it.
- Estimated Time: 1.5 to 2 hours total (hands-off method)
What You’ll Need:
- 1 can of Coca-Cola (regular, not diet — the sugar helps)
- Your burnt pan or saucepan
- Stove (for heating)
- A sponge or scrubber
- Paper towels (for cleanup)
The Practical: I had this stainless steel saucepan where I’d totally nuked some pasta sauce — like the kind where the bottom looks like charcoal. I poured in a full can of regular Coke (about 330ml), making sure it covered the burnt layer completely. Then I put it on the stove over medium heat, just until it started to simmer — not boil.
I let it simmer for about 20–25 minutes. During that time, you could literally see bits of the burnt layer softening and floating up (kind of gross, kind of satisfying). After turning the heat off, I let it sit for another hour to cool and soak fully.
Then I used a sponge and started wiping… and guess what? A big chunk of the black gunk came right off. I had to go over it again with a little dish soap and a scrub, but it was way easier than starting from scratch.
How It Went:
- The acids in Coke help loosen burnt residue from metal surfaces
- No harsh scrubbing needed — the burnt stuff lifted with just a sponge
- The pan smelled faintly like soda (but that rinsed off easily)
Final Results:
- I got the pan about 90% clean, with the rest needing a quick touch-up using a little baking soda
- Super easy — no steel wool, no soaking overnight
- No damage or scratches to the pan
Final Thoughts: Using Coca-Cola to clean a burnt pan is one of those weird hacks that actually works — especially if you’re dealing with light to medium burns. It won’t magically fix a pot that’s been left on the burner for an hour, but for everyday mishaps? It’s golden.
Rating: 8.5/10 [click to expand]
- ✅ Easy, cheap, and kinda fun
- ✅ Surprisingly effective
- ✅ No harsh chemicals
- ❌ Doesn’t work well if there’s a super thick black crust
- ❌ Not great on non-stick pans (because you’re heating them)
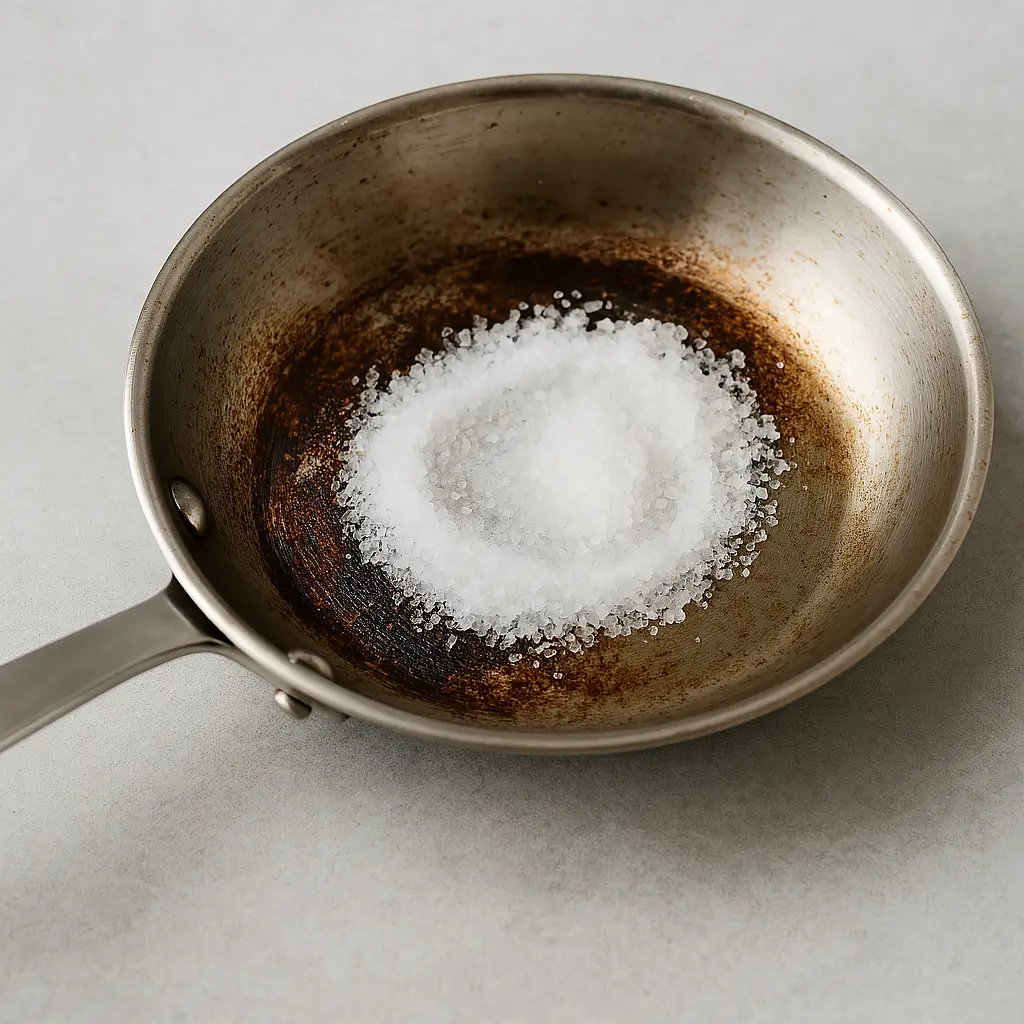
METHOD 8: clean a burnt pan with “salt”
Now let’s talk about the good ol’ salt method for cleaning a burnt pan. This one’s an old-school trick — your grandma probably knew it, and there’s a reason it stuck around. Salt works like a natural abrasive without scratching your pan to death, and it helps loosen up all that burnt-on gunk. It’s incredibly awesome for cast iron and stainless steel pans, and it’s super cheap — like dirt cheap. So let’s break it down, step-by-step.
- Estimated Time: 10–20 minutes total
What You’ll Need:
- Coarse salt (kosher or sea salt works best — avoid super fine table salt)
- A little warm water
- A sponge or cloth (or a potato… I’ll explain)
- Dish soap (optional)
The Practical: So I had this small non-coated steel skillet where I managed to burn some scrambled eggs (I know, tragic). The residue was stuck like glue and wouldn’t budge with regular washing.
Here’s what I did:
- I poured about 2–3 tablespoons of coarse salt into the pan, just enough to coat the burnt area.
- Then I added just a few drops of warm water, enough to make a salty paste.
- For scrubbing, I used a sponge on one half and a halved potato on the other half — yes, a raw potato. It actually works because the starchy surface grips the salt and helps scrub it around.
- I gently scrubbed in circles, no hard pressure needed.
Within like 5 minutes, the burnt layer started to loosen. I rinsed the pan, and most of the gunk was gone. A second round of salt and scrubbing totally cleaned it.
How It Went:
- Worked best for light to medium burns
- Scrubbing was gentle, didn’t scratch the pan at all
- The potato scrub was oddly satisfying 😄
- Didn’t need any fancy tools or chemicals
Final Results:
- The pan was about 95% clean after just 10 minutes
- Needed no soaking, no heating, no elbow-breaking scrubbing
- No scratches or damage to the surface
- Left the pan with a nice clean finish, especially stainless steel
Rating: 9/10 [click to expand]
- ✅ Super affordable
- ✅ Non-toxic, food-safe, and eco-friendly
- ✅ No harsh scrubbing or chemicals
- ✅ Great for stainless steel and cast iron
- ❌ Not very effective on thick, carbon-like crusts
- ❌ Won’t work well on non-stick pans (too abrasive for the coating)
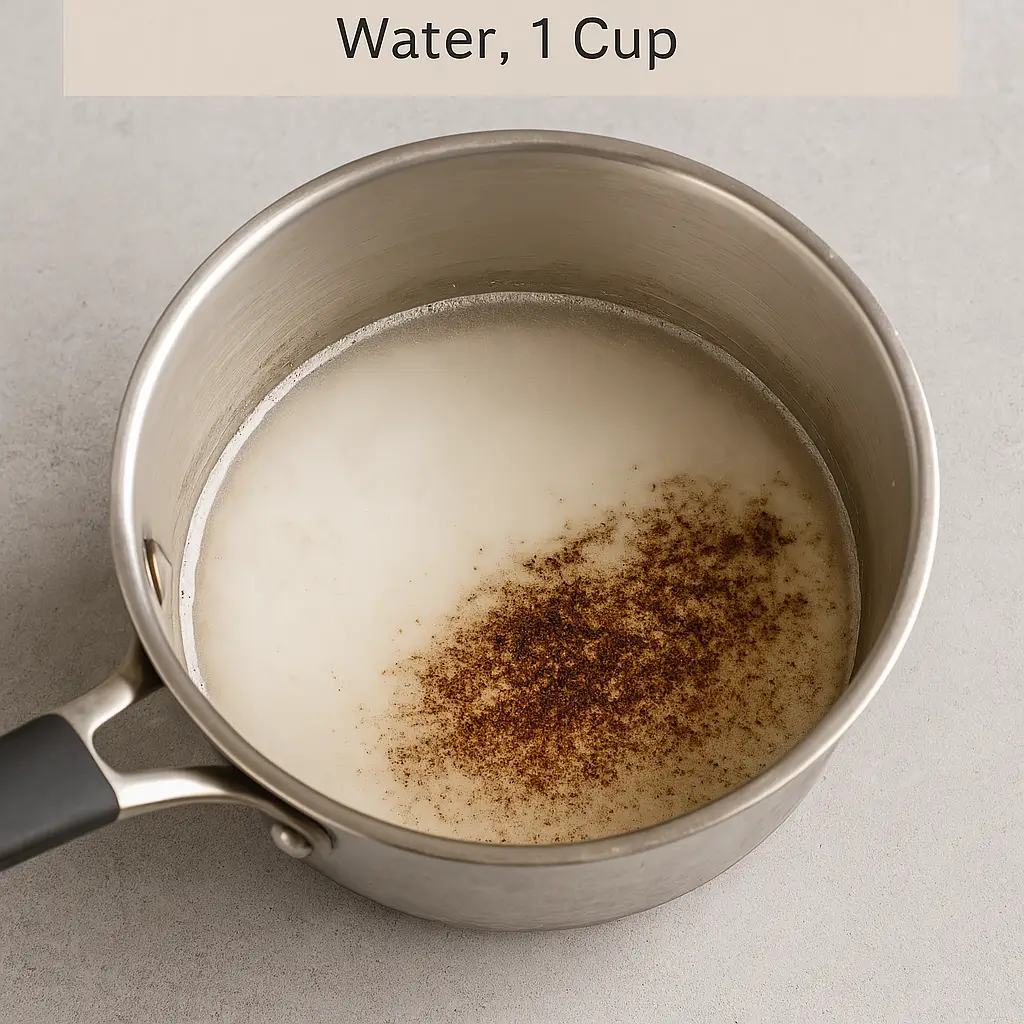
BONUS: cream of tartar method
let’s talk about a lesser-known hero in the burnt pan rescue game: the Cream of Tartar method. Now I know what you’re thinking — “Wait, isn’t that for baking cookies?” Yeah, it usually is. But this weird white powder? It’s got secret cleaning powers too, and it actually works on burnt pans, especially stainless steel and aluminum.
Let’s break it down 👇
- Estimated Time: 20–25 minutes total
What You’ll Need:
- 1 tablespoon of cream of tartar
- 1 cup of water
- A scrubber or sponge
- A burnt pan that you thought was ruined 😅
The Practical: I had this small saucepan with scorched milk (the WORST smell btw), and it left behind that classic brown sticky crust. Here’s how I used cream of tartar to deal with it:
- I mixed 1 tablespoon of cream of tartar with 1 cup of water right in the burnt pan.
- Put it on the stove and brought it to a gentle boil for about 5–7 minutes.
- After boiling, I turned off the heat and let it cool down for another 10 minutes.
- Once it cooled, I grabbed a sponge and started scrubbing. No crazy pressure, just gentle circular scrubbing.
The burnt layer started lifting off like it wasn’t even a big deal. Honestly, I was surprised because cream of tartar sounds like something that belongs in a meringue, not in a burnt disaster zone.
How It Went:
- The boiling helped loosen the burnt parts big time.
- The mixture didn’t stink like vinegar does (huge bonus).
- Worked great for a milk burn, which is usually tough to clean.
- Didn’t scratch the surface at all.
Final Result:
- Pan looked 95% clean after just one round.
- Way less effort than the foil or salt methods.
- The shiny metal finish came back — no discoloration, no damage.
💰 Cost Breakdown:
- Cream of tartar isn’t super cheap, but a little goes a long way.
- One small jar (like $2–3) will last you for tons of cleaning sessions.
- So this method cost me like $0.30 max per pan.
Final Thoughts: If you’ve got cream of tartar sitting in your pantry collecting dust — give it a second life as a burnt pan savior. Especially good for light-to-medium burns and delicate pots. It’s gentle, no-stink, and chemical-free — and it actually feels like a cheat code when you see the results.
Honestly? I didn’t expect this one to work as well as it did. It’s like the underdog of pan-cleaning methods. Quiet but deadly on grime.
Rating: 9.5/10 [click to expand]
- ✅ Super effective, even for tough burns like dairy
- ✅ Safe for all cookware, especially aluminum or stainless steel
- ✅ No strong smell or fumes
- ✅ Requires hardly any scrubbing
- ❌ Cream of tartar isn’t always in everyone’s kitchen
- ❌ Not the best for really thick, carbonized layers
Must-Haves to Clean Burnt Pans
Struggling with a stubborn burnt pot or pan? Don’t worry — here are the best tools and ingredients you can grab from Amazon to make your cleaning mission a total success. All hand-picked, all effective.
| Product Name | What It’s For | Amazon Link |
|---|---|---|
| Arm & Hammer Baking Soda (4 lb) | Great for scrubbing and fizzing up burnt areas. Used in multiple methods. | 👉 Buy on Amazon |
| Heavy-Duty Aluminum Foil (Reynolds Wrap) | Perfect when combined with baking soda as a scrubber. | 👉 Buy on Amazon |
| Finish Powerball Dishwasher Tablets | For dissolving burnt food gunk with minimal effort. | 👉 Buy on Amazon |
| McCormick Cream of Tartar (3 oz) | Mix with water to clean stainless steel pans naturally. | 👉 Buy on Amazon |
| Bounce Fabric Softener Dryer Sheets | Drop one in water, let the pan soak — lazy but magic. | 👉 Buy on Amazon |
| Bar Keepers Friend Powder Cleanser | Excellent for stainless steel, removes burnt bits fast. | 👉 Buy on Amazon |
| Heinz Cleaning Vinegar (1 gal) | Works with baking soda for fizz-powered cleaning. | 👉 Buy on Amazon |
| ReaLemon 100% Lemon Juice | If you don’t have fresh lemons, this works for boiling method. | 👉 Buy on Amazon |
| Easy-Off Professional Oven Cleaner | Best for carbon-coated, severely burnt pans. Use with caution. | 👉 Buy on Amazon |
Related Article: Glass vs Metal Bakeware Which is Better for Cooking
FAQs
How do you clean a badly burnt pot?
The best way to tackle a badly burnt pot is to loosen up the burnt-on mess first. Start by boiling water in the pan to soften the gunk. Then go in with a method like baking soda and aluminum foil scrub, dishwasher tablet soak, or the classic vinegar and baking soda volcano. These methods work great to lift up the crusty bits without damaging your pan.
Does baking soda and vinegar clean burnt pans?
Yes, totally! When you combine baking soda and vinegar, it creates a fizzy reaction that helps break down stubborn burnt food and blackened oil. Bring the vinegar to a boil in the pan first, then add baking soda and let it foam up. It’s oddly satisfying and super effective for medium to heavy burns.
Can a burnt pot be saved?
Most of the time, yes — unless it’s literally melted or warped. If your pot is just scorched or blackened, it’s almost always savable. You just need the right cleaning method and a little elbow grease. Even really bad burns can often be cleaned using oven cleaner, dryer sheets, or Coke boil methods.
How do you clean a badly burnt enamel pot?
Enamel pots are a little delicate, so avoid harsh scrubbing or steel wool. A safe method is boiling water with vinegar or lemon slices, then letting it cool and adding baking soda. Also, cream of tartar is surprisingly gentle and effective on enamel. Always use a soft sponge to avoid damaging the enamel coating.
What is the easiest way to clean a burnt pot?
If you’re short on time and want low effort, the dishwasher tablet method is the easiest. Just drop a tablet in the burnt pot, pour in hot water, and let it sit for an hour or overnight. Come back later and most of the burnt stuff wipes off like magic.
How to get rid of black stains on stainless steel pots?
Black stains are usually from burnt oil or food, and they cling hard. Try the salt scrub method for surface stains, or boil a mix of cream of tartar and water to dissolve deeper stains. After cleaning, you can also use a stainless steel polish to bring back the shine.